Process needed to bring full fibre optics infrastructure to your home
FTTH by Open Infra
Free WiFi 6 router available
4300+
Connected Homes
29
Projects Completed
Process needed to bring full fibre optics infrastructure to your home
FTTH by Open Infra
Free WiFi 6 router available
4300+
Connected Homes
29
Projects Completed
01 - Installation
Physically connecting your home to the fibre that has arrived in your area.
02 - Onboarding
Testing the line and commissioning your property ready for activation.
Support
Customer Service is available to answer any queries that you may have.
01 - Installation
Physically connecting your home to the fibre that has arrived in your area.
02 - Onboarding
Testing the line and commissioning your property ready for activation
Support
Customer Service is available to answer any queries that you may have.
01 – INSTALLATION
Before you begin the installation process, please make sure you have read and agreed to the terms stated in your contract.
01 – INSTALLATION
Before you begin the installation process, please make sure you have read and agreed to the terms stated in your contract.
Open Infra runs fibre through existing ducts and pipes to your area. Once the work in your area is completed and all tests come back positive your location is made ‘live’. Our Installation Engineers will then start connecting your home to our network.

The Installation will happen in 2 stages.
The first stage involves sending a Installation Engineer to your home to install two boxes.
On the inside the engineer will mount a box called a Optical Network Terminal (ONT) where light is converted into a network signal so that your router can communicate with it.
On the outside he will install a Customer Splice Point (CSP) box which will be the place where the inside fibre cable is joined with the fibre from your street.
The second stage of the process involves connecting a fibre cable from the street to your CSP located on the outside wall of your home.
Depending on your area, the fibre cable will either be attached to a pole or fed underground via a duct.
Open Infra runs fibre through existing ducts and pipes to your area. Once the work in your area is completed and all tests come back positive your location is made ‘live’.
Our Installation Engineers will then start connecting your home to our network.

The Installation will happen in 2 stages.
The first stage involves sending a Installation Engineer to your home to install two boxes.
On the inside the engineer will mount a box called a Optical Network Terminal (ONT) where light is converted into a network signal so that your router can communicate with it.
On the outside he will install a Customer Splice Point (CSP) box which will be the place where the inside fibre cable is joined with the fibre from your street.
The second stage of the process involves connecting a fibre cable from the street to your CSP located on the outside wall of your home.
Depending on your area, the fibre cable will either be attached to a pole or fed underground via a duct.
02 – ONBOARDING
Please make sure the Nokia ONT installed on the inside is POWERED ON so we may connect to it and test the line.
Congratulations on reaching the Onboarding stage. This means all the physical part of process of getting fibre to your home has now been completed.
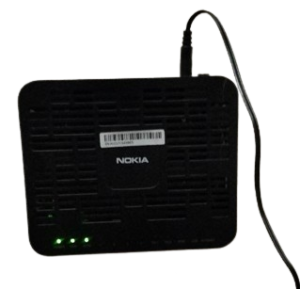
From now on the focus should be on the Nokia ONT (black box on the inside) and the green lights on it’s front facing panel.
It is vital that you have the ONT powered on during this process or it will delay the Onboarding process.
 Below is the description of each of the 3 lights that needs to be ON to confirm your home is now ready for the internet to be activated on your chosen date.
. PWR – The Nokia ONT has successfully powered on and ready to be attached to our network.
. PON – Passive Optical Network, You have successfully physically connected to the Open Infra network.
. AUTH – Your details have been added to our system and all tests have come back positive.
The AUTH light will take between 5 – 7 days to appear after the installation has been completed.
Recieving the 3rd light (AUTH) will mean you have now completed the Onboarding process.
When you internet is activated on the date you requested you can then connect any commercially available router to any one of the yellow ports on the Nokia ONT.
Your router when switched on and WAN configured as DHCP or Dynamic IP will automatically recieve a IP address from our network. No password will be needed to connect to our network.
I WANT TO USE MY OWN ROUTER
Some examples of how to setup your own home network with the Nokia ONT.
ORDER AND SETUP A FREE ROUTER
For those who do not have their home network, we can provide a free router.
02 – ONBOARDING
Please make sure the Nokia ONT installed on the inside is POWERED ON so we may connect to it and test the line.
Congratulations on reaching the Onboarding stage. This means all the physical part of process of getting fibre to your home has now been completed.
From now on the focus should be on the Nokia ONT (black box on the inside) and the green lights on it’s front facing panel.
It is vital that you have the ONT powered on during this process or it will delay the Onboarding process.
Below is the description of each of the 3 lights that needs to be ON to confirm your home is now ready for the internet to be activated on your chosen date.
. PWR – The Nokia ONT has successfully powered on and ready to be attached to our network.
. PON – Passive Optical Network, You have successfully physically connected to the Open Infra network.
. AUTH – Your details have been added to our system and all tests have come back positive.

The AUTH light will take between 5 – 7 days to appear after the installation has been completed.
Recieving the 3rd light (AUTH) will mean you have now completed the Onboarding process.
When you internet is activated on the date you requested you can then connect any commercially available router to any one of the yellow ports on the Nokia ONT.
Your router when switched on and WAN configured as DHCP or Dynamic IP will automatically recieve a IP address from our network. No password will be needed to connect to our network.
I WANT TO USE MY OWN ROUTER
Some examples of how to setup your own home network with the Nokia ONT.
ORDER AND SETUP A FREE ROUTER
For those who do not have their home network, we can provide a free router.
SUPPORT
Please make sure you have read the Faq’s section before contacting Customer support.
SUPPORT
Please make sure you have read the Faq’s section before contacting Customer support.

Customer Support:
0808 175 0904
Email:
info.uk@openinfra.com
Once your service is live and you are using the internet, then please contact your Internet Service Provider as stated on your invoice and documentation.
Frequently Asked Questions by our customers during the Installation and Onboarding process
My internet from the Nokia ONT (black box) has stopped working.
There may be some planned maintenance in your area. You can check this by visiting https://uk.openinfra.com/status/
After a inccident or planned service work, you may need to restart the Nokia ONT (black box), router and devices. Leave the Nokia completely turned off for 15-30 minutes before turning it on again, then restart your router.
I need to open up ports on my Free Router I received from you. How can I do this?
The Free Gardio Gateway Router is administered with the HomePass by Plume App. Visit the Plume support page to learn how to do this.
https://support.plume.com/s/article/Setting-up-Port-Forwarding-in-HomePass?language=en_GB
Can I upgrade to a faster speed whilst I'm still in a contract?
Yes certainly, please contact your Internet Service Provider (ISP) who will be happy to help you.
If you are unsure who your ISP is, check your invoice or documentation for their contact or website details.
